Control application
The control application contains all required hardware support for controlling and monitoring the attached pixelchip. It also provides a remote interface for controlling the chip, and for readout and configuration of the supporting peripherals.
Development
The control application is located in git at https://gitlab.nikhef.nl/spidr4/controlboard_app. By default the control application is built when a new Linux distribution is built. In order to facilitate debugging and quick testing of the application it is also possible to build the application outside of the Petalinux build environment using the accompanying SDK. Please see Petalinux for more information.
Requirements
An up to date Linux system (CentOS7+, Ubuntu 18.04+).
CMake
Copy of the GIT control-board Linux application
The ctrl2019.1 SDK
For debugging:
VSCode
SSH key installed on the control board
The SDK is downloadable from the SPIDR4 file-server.
Building
First the control board SDK needs to be installed on your system and the control application should be checked out from GIT.
Then source the SDK setup script:
$ . <sdk_install>/environment-setup-cortexa9t2hf-neon-xilinx-linux-gnueabi
Create a directory ‘build’ in the root of the control project and enter it. Then invoke:
$ cmake ..
If all is well you should be able to build the application now by invoking make:
$ make
And a fresh control app executable should appear in your build directory.
Debugging using Visual Studio Code
Though Xilinx recommends using the Xilinx tools, I was unable to get debugging to function properly. Therefore I’m using VSCode and GDB for debugging
Open the source folder in VSCode and build the control app for debugging in the subdirectory build using the following command:
$ cmake -DCMAKE_BUILD_TYPE=Debug ..
Note that in VSCode you also need to source the SDK setup script, otherwise it won’t work. Though VSCode has a CMake plugin, it is unable to configure CMake correctly.
$ make clean && make
From this point on VSCode’s CMake plugin can build the code correctly.
Install your public key on the root account of the SPIDR4 board using the ssh-copy-id command, such that you can log onto the SPIDR4 board without entering a password. See https://www.digitalocean.com/community/tutorials/how-to-set-up-ssh-keys–2 for a good write-up on this subject.
And create a .vscode/tasks.json file containing the following:
{
  "version": "2.0.0",
  "tasks": [
    {
        "label": "publish",
        "type": "shell",
        "dependsOn": "build",
        "promptOnClose": false,

        "presentation": {
            "reveal": "always",
            "panel": "new"
        },
        "options": {
            "cwd": "${workspaceFolder}"
        },
        "linux": {
            "command": "scp ${cwd}/build/control root@192.16.192.232:/usr/bin/."
        },
        "problemMatcher": []
    }
  ]
}
and create the following ‘.vscode/launch.json’ file:
{
  "version": "0.2.0",
  "configurations": [
    {
      "name": "Control on target",
      "type": "cppdbg",
      "request": "launch",
      "program": "/usr/bin/control",
      "args": [],
      "stopAtEntry": true,
      "cwd": "/usr/bin",
      "environment": [],
      "externalConsole": false,
      "MIMode": "gdb",
      "preLaunchTask": "publish",
      "pipeTransport": {
          "pipeCwd": "/usr/bin",
          "pipeProgram": "/usr/bin/ssh",
          "pipeArgs": [
            "root@192.16.192.232"
        ],
        "debuggerPath": "/usr/bin/gdb"
      },
    }
  ]
}
Don’t forget to replace 192.16.192.232 for the IP address of your control board.
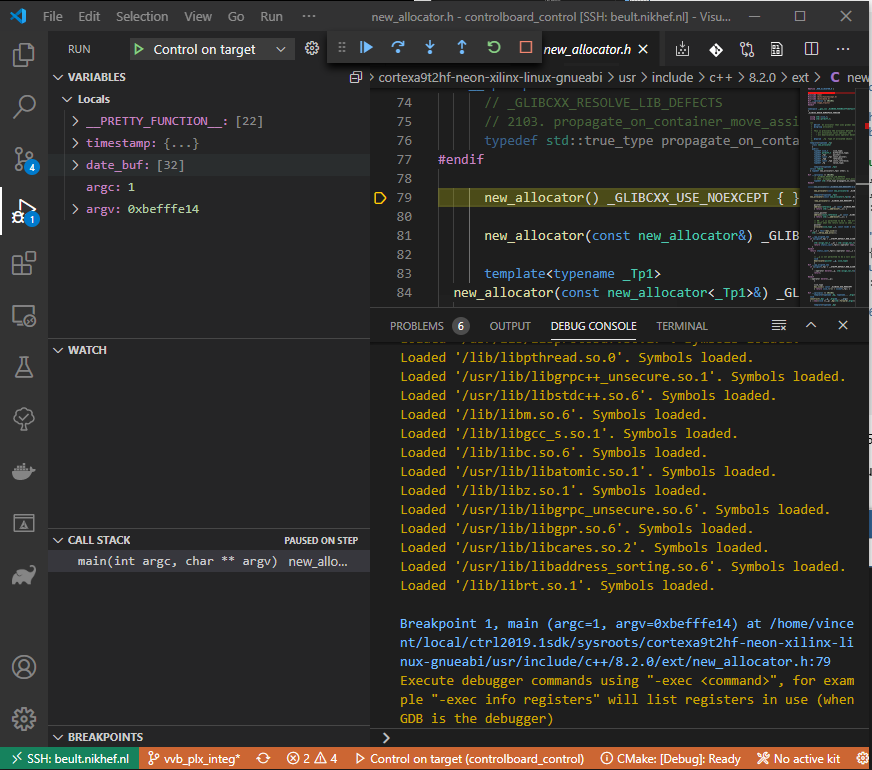
When all is successful you should be able to go to the debug view and start the debug by pressing the green arrow after ‘Control on target’:

Troubleshooting
Nothing happens when I press debug
Have patience. Uploading the control app takes time.
I get a file ‘File busy’ error
Yes, in order to run the control app you first need to stop it on the remote machine, as it is started by default.
Ok, it works, but VSCode thinks all paths are stupid
When VSCode is started outside of the context of the sourced SDK, it will not like it. You must provide your own C++ configuration. Choose ‘Edit Configuration’ from the command menu, and paste in the configuration below. note that you’ll need to replace <path to SDK> with the actual path.
{
  "configurations": [
      {
          "name": "Linux",
          "includePath": [
            "<path to SDK>/sysroots/cortexa9t2hf-neon-xilinx-linux-gnueabi/usr/include/**",
            "${workspaceFolder}/src",
            "${workspaceFolder}/build/generated/**",
            "${workspaceFolder}/build/_deps/easyloggingpp-src/src",
            "${workspaceFolder}/build/_deps/csvparser-src",
            "${workspaceFolder}/build/_deps/simpleini-src",
            "${workspaceFolder}/thirdparty/xadc"
          ],
          "defines": ["__ARM_PCS_VFP"],
          "compilerPath": "<path to SDK>/sysroots/x86_64-petalinux-linux/usr/bin/arm-xilinx-linux-gnueabi/arm-xilinx-linux-gnueabi-gcc",
          "cStandard": "gnu18",
          "cppStandard": "gnu++14",
          "intelliSenseMode": "gcc-x64"
      }
  ],
  "version": 4
}
I’ve updated shared, but control app does not copy the changes
First clean, then remove the build/_deps/shared-src directory, and build again.